Are you looking for a simple, wholesome way to preserve that fresh garden tomato flavor all year long? In this article, we’ll walk you through the process of canning whole tomatoes in their own juice, just like Crystal from our channel demonstrated in her video. Whether you’re a beginner or an experienced home canner, this method—adapted from the Ball Preserving Book—is an excellent way to enjoy ripe, garden-fresh tomatoes even in the heart of winter.
Why Can Whole Tomatoes?
Canning whole tomatoes is an efficient way to preserve your garden’s bounty without losing the vibrant taste of summer. When packed in their own juice, tomatoes retain a fresh flavor that works wonderfully in pasta sauces, soups, stews, and even on homemade pizza.
Unlike freezing, canning doesn’t require electricity for storage. It’s shelf-stable and long-lasting, making it a homesteading favorite.
What You’ll Need
This recipe is as simple as it gets. Here’s what you’ll need:
Fresh Roma tomatoes (or any tomato variety you prefer)
Bottled lemon juice or citric acid
Canning jars with lids and bands
Water bath canner
Large pot for blanching
Ice bath bowl
Basic kitchen tools (tongs, colander, bubble remover, vinegar, rag)
Optional: Non-iodized salt for added flavor
Step-by-Step Guide to Canning Whole Tomatoes
1. Wash and Inspect Your Tomatoes
Start by washing your tomatoes thoroughly. Remove stems and discard any bruised or spoiled tomatoes. Damaged ones can be shared with chickens or composted.

2
2. Blanch and Peel
Bring a large pot of water to a boil. Blanch tomatoes in batches for 30 seconds to 2 minutes, until the skins crack or wrinkle. Immediately transfer to an ice water bath to halt the cooking process. Once cooled, the skins will slip off easily.
3. Prepare Jars and Canner
While peeling, warm your water bath canner over low heat. Place jars in the canner rack without submerging them. This preheats the jars and reduces the risk of breakage when hot contents are added.
4. Add Acidity
To ensure safety, add 1 tablespoon of bottled lemon juice (or ¼ teaspoon of citric acid) per pint jar. This helps balance pH for safe canning. If using quart jars, double the amount.
5. Pack Tomatoes
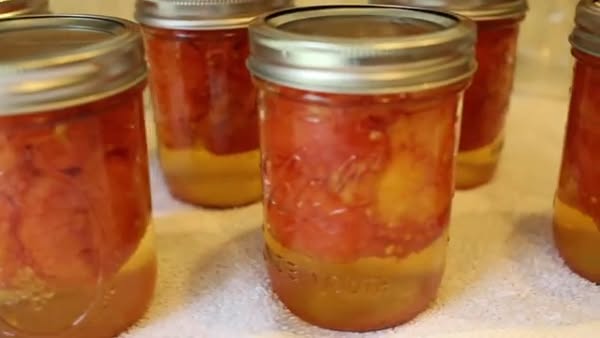
Gently pack whole, peeled tomatoes into the jars. Press them down slightly to release juice, covering each layer with its natural juices. Leave ½ inch of headspace at the top.
🔍 Pro Tip: This can be a messy step! Keep a bowl nearby for skins and juice overflow.
6. Clean Jar Rims
Use a clean rag dipped in white vinegar to wipe the rims. This ensures a good seal by removing any juice or pulp residue. Avoid linty cloths—t-shirt rags work best.
7. Seal the Jars
Place lids on the jars and screw bands on finger-tight. This means using just your fingertips to tighten—not too loose, not overly tight.

3
8. Process in Water Bath
Lower jars into the water bath canner, making sure they are covered by at least 1 inch of water. Bring the water to a rolling boil, then process for:
85 minutes for quart jars
85 minutes for pint jars
Adjust for altitude as necessary.
9. Cool and Store
After processing, turn off the heat and let jars sit for 5 minutes before removing. Place jars on a towel-covered counter and let them rest undisturbed for 12–24 hours.
Once cooled:
Label with date and contents
Remove bands for long-term storage

4
Store in a cool, dark pantry
How to Use Canned Whole Tomatoes
Crystal’s favorite way to use these tomatoes? Homemade veggie pizza! Strain the tomatoes and layer them over your dough for a fresh, tangy topping. They also work perfectly in sauces, soups, and casseroles.
Final Thoughts

5
While canning whole tomatoes is not complicated, it is time-consuming. But once you’ve got your jars lined up on the pantry shelf, it’s all worth it. With just tomatoes and lemon juice, you’ll have a versatile ingredient ready for your winter recipes.


